Having a tough time? Book time with me 1-on-1 for some help!
¶  What is qBittorrent?
qBittorrent is a free and open-source software that aims to provide the same features as µTorrent, such as polished user interface, no ads, search engine, torrent creation tool and more. It runs on all major platforms (Windows, Linux, macOS, FreeBSD, OS/2) and supports many Bittorrent extensions.
¶ 1 · Deploy qBittorrent
 Hotio + VPN Linuxserver Wireguard Gluetun + qBit NordVPN + qBit Hotio + Private Internet Access (PIA)
services:
  qbittorrent:
    container_name: qbittorrent
    image: ghcr.io/hotio/qbittorrent:release-5.1.2
    restart: unless-stopped
    ports:
      - 8080:8080
    environment:
      - PUID=568
      - PGID=568
      - UMASK=002
      - TZ=America/New_York
      - WEBUI_PORTS=8080/tcp,8080/udp
      - VPN_ENABLED=true
      - VPN_CONF=wg0
      - VPN_PROVIDER=generic
      - VPN_LAN_NETWORK=10.99.0.0/24
      - VPN_LAN_LEAK_ENABLED=false
      - VPN_EXPOSE_PORTS_ON_LAN=
      - VPN_AUTO_PORT_FORWARD= # enter port number here
      - VPN_PORT_REDIRECTS= # enter port number here
      - VPN_FIREWALL_TYPE=auto
      - VPN_HEALTHCHECK_ENABLED=false
      - VPN_NAMESERVERS=wg
      - PRIVOXY_ENABLED=false
    cap_add:
      - NET_ADMIN
    sysctls:
      - net.ipv4.conf.all.src_valid_mark=1
      - net.ipv6.conf.all.disable_ipv6=1
    volumes:
      - /mnt/tank/configs/qbittorrent:/config
      - /mnt/tank/media:/media
If you want to change the webui ports to something other then
8080, change the ports section to something like:ports: - 8081:8081And change the
WEBUI_PORTSvariable to the same port (both for tcp and udp).
Environment Variables Explanations (click to expand)
| Variable | Value |
|---|---|
VPN_CONF |
With VPN_CONF you can set the name used for your WireGuard config. There needs to be a file wg0.conf located in /config/wireguard for the VPN to start. |
VPN_LAN_NETWORK |
The environment variable VPN_LAN_NETWORK can be set to for example 192.168.1.0/24, 192.168.1.0/24,192.168.44.0/24, so you can get access to the webui or other additional ports. If for example you were to pick 192.168.0.0/24, every device with an ip in the range 192.168.0.0 - 192.168.0.255 on your LAN is allowed access to the webui. |
VPN_EXPOSE_PORTS_ON_LAN |
If you need to expose ports on your LAN you can use VPN_EXPOSE_PORTS_ON_LAN. For example VPN_EXPOSE_PORTS_ON_LAN=7878/tcp,9117/tcp, will block those ports on the vpn interface, so that there's no risk that they might be exposed to the world and allow access to them from your LAN. Some images also have a WEBUI_PORTS environment variable that does basically the same for the vpn part. For those apps that support it, it'll also change the port on which the app runs. |
VPN_AUTO_PORT_FORWARD |
Auto retrieve a forwarded port and configure the supported app if set to true or if you can manually request/set a forwarded port in the VPN provider's web interface, fill in the port number (just the number). |
VPN_PORT_REDIRECTS |
Adds a redirect for the forwarded port from your vpn provider to the internal port on which the app runs, ports in this list are also not blocked on the wireguard interface, so this var is also useful if you want to expose a port on both your LAN and VPN. Values like 32400/tcp will use the port from VPN_AUTO_PORT_FORWARD to create the redirect or if set to true the forwarded port from pia/proton. Use 3000@3001/tcp,3002@3003/tcp syntax for extra static redirects. The only known usecase as of right now is Plex and exposing it on the VPN with a non configurable forwarded port, because it's not possible to run Plex on anything else but 32400. |
VPN_FIREWALL_TYPE |
Possible values are auto, legacy or nftables. The default is auto, this will try to use the most modern method available. If this doesn't work, you can try forcing it to legacy or nftables. |
VPN_HEALTHCHECK_ENABLED |
This is almost never needed, only in very rare cases (mostly when using PIA). |
VPN_NAMESERVERS |
Possible values are wg, 8.8.8.8 or 1.1.1.1@853#cloudflare-dns.com seperated by a ,. The value wg will use the nameservers from the wg0.conf file. The value 8.8.8.8 is to use a plain old nameserver. The value 1.1.1.1@853#cloudflare-dns.com will add a DNS over TLS nameserver, this will override all other regular nameservers. Leaving the variable empty will allow Unbound to work in recursive mode. |
For more info on these values, look here
When you start this container it will fail until you add the VPN config file.
¶ The Wireguard wg0.conf File
In whatever wireguard file your VPN provider gives you, you must:
- Remove any IPv6 information
- Place the file in the
/mnt/tank/configs/qbittorrent/config/wireguardfolder - Name it
wg0.conf
This is the recommended approach for Servers@Home. It uses 100% stock linuxserver.io containers (no custom images to maintain!) with automatic killswitch protection.
How it works:
- qBittorrent shares WireGuard's network namespace using
network_mode: "service:wireguard" - All torrent traffic routes through the VPN tunnel (wg0 interface)
- WebUI remains accessible from your local network via LAN bypass
- Firewall rules in wg0.conf prevent IP leaks even if qBittorrent is misconfigured
Why two containers?
- Natural killswitch: qBittorrent literally cannot access any network except through wg0
- No custom images: Uses 100% stock linuxserver containers - just add PostUp to your wg0.conf
- Easier maintenance: Update qBittorrent without rebuilding VPN container
- Better isolation: VPN and torrent client are independent
services:
wireguard:
image: linuxserver/wireguard:latest
container_name: wireguard-vpn
cap_add:
- NET_ADMIN
- SYS_MODULE
environment:
- PUID=568
- PGID=568
- TZ=America/New_York
volumes:
- /mnt/tank/configs/wireguard:/config
- /lib/modules:/lib/modules:ro
sysctls:
- net.ipv4.conf.all.src_valid_mark=1
- net.ipv6.conf.all.disable_ipv6=1
ports:
- 8080:8080 # qBittorrent WebUI
restart: unless-stopped
healthcheck:
test: ["CMD-SHELL", "ts=$$(wg show wg0 latest-handshakes 2>/dev/null | awk '{print $$2}') && [ -n \"$$ts\" ] && [ \"$$ts\" -gt 0 ] && [ $$(( $$(date +%s) - $$ts )) -lt 120 ]"]
interval: 15s
timeout: 5s
retries: 3
start_period: 40s
qbittorrent:
image: linuxserver/qbittorrent:latest
container_name: qbittorrent
network_mode: service:wireguard
environment:
- PUID=568
- PGID=568
- TZ=America/New_York
- WEBUI_PORT=8080
volumes:
- /mnt/tank/configs/qbittorrent:/config
- /mnt/tank/media:/media
depends_on:
wireguard:
condition: service_healthy
restart: unless-stopped
CRITICAL SECURITY REQUIREMENT: Your
wg0.confMUST include the PostUp line shown in Section 2 below. Without it, your real IP will be exposed! The PostUp line does two things: (1) allows WebUI access from your LAN, and (2) blocks all non-VPN traffic with a firewall.
¶ Changing the Port
In the event you cannot use 8080 follow these changes to use 8070 for example:
services:
wireguard:
ports:
- "8070:8070" # Changed BOTH sides
# ... rest of config
qbittorrent:
environment:
- WEBUI_PORT=8070 # Tell qBittorrent to run on 8070 internally
# ... rest of config
¶ The Wireguard wg0.conf File
In whatever wireguard file your VPN provider gives you, you must:
-
Remove any IPv6 information
-
Change DNS to public resolver (like
1.1.1.1or8.8.8.8)- Many VPN provider DNS servers use IP addresses in the 10.0.0.0/8 range
- The LAN bypass routes 10.0.0.0/8 to your local network
- This causes DNS queries to route incorrectly
- Solution: Use public DNS (1.1.1.1, 8.8.8.8) instead of VPN provider DNS
-
Change the Network Interface to
wg0in the Advanced tab from this section -
Add this line to the
[Interface]section of yourwg0.conffile to allow the webUI to be accessible:PostUp = GW=$(ip route | grep default | awk '{print $3}' | head -1); IF=$(ip route | grep default | awk '{print $5}' | head -1); ip route add 192.168.0.0/16 via $GW dev $IF 2>/dev/null || true; ip route add 10.0.0.0/8 via $GW dev $IF 2>/dev/null || true; ip route add 172.16.0.0/12 via $GW dev $IF 2>/dev/null || true; ip route add 100.64.0.0/10 via $GW dev $IF 2>/dev/null || true; ip route add 100.84.0.0/16 via $GW dev $IF 2>/dev/null || true; iptables -A OUTPUT -o $IF -m conntrack --ctstate ESTABLISHED,RELATED -j ACCEPT; iptables -A OUTPUT -o $IF -d 192.168.0.0/16 -j ACCEPT; iptables -A OUTPUT -o $IF -d 10.0.0.0/8 -j ACCEPT; iptables -A OUTPUT -o $IF -d 172.16.0.0/12 -j ACCEPT; iptables -A OUTPUT -o $IF -d 100.64.0.0/10 -j ACCEPT; iptables -A OUTPUT -o $IF -d 100.84.0.0/16 -j ACCEPT; iptables -A OUTPUT -o $IF -j DROP
⚠️ Why the PostUp line is critical
When using network_mode: "service:wireguard", qBittorrent shares the WireGuard container's network namespace. This means qBittorrent can see BOTH interfaces:
- wg0 (VPN tunnel) - SAFE
- eth0 (physical network) - EXPOSES YOUR REAL IP
Without the PostUp firewall rules, qBittorrent can leak traffic through eth0!
The PostUp line below does two things:
- LAN bypass routing: Allows WebUI access from local networks (192.168.x.x, 10.x.x.x, etc.)
- Firewall protection: Blocks ALL traffic on eth0 except LAN traffic (prevents IP leaks)
This firewall-based approach means qBittorrent is protected even if you forget to bind it to wg0 interface in the settings. It's enforced at the network layer, not the application layer.
¶ Example wg0.conf
[Interface]
Address = 10.162.71.91/32
PrivateKey = redacted
MTU = 1320
DNS = 1.1.1.1
PostUp = GW=$(ip route | grep default | awk '{print $3}' | head -1); IF=$(ip route | grep default | awk '{print $5}' | head -1); ip route add 192.168.0.0/16 via $GW dev $IF 2>/dev/null || true; ip route add 10.0.0.0/8 via $GW dev $IF 2>/dev/null || true; ip route add 172.16.0.0/12 via $GW dev $IF 2>/dev/null || true; ip route add 100.64.0.0/10 via $GW dev $IF 2>/dev/null || true; ip route add 100.84.0.0/16 via $GW dev $IF 2>/dev/null || true; iptables -A OUTPUT -o $IF -m conntrack --ctstate ESTABLISHED,RELATED -j ACCEPT; iptables -A OUTPUT -o $IF -d 192.168.0.0/16 -j ACCEPT; iptables -A OUTPUT -o $IF -d 10.0.0.0/8 -j ACCEPT; iptables -A OUTPUT -o $IF -d 172.16.0.0/12 -j ACCEPT; iptables -A OUTPUT -o $IF -d 100.64.0.0/10 -j ACCEPT; iptables -A OUTPUT -o $IF -d 100.84.0.0/16 -j ACCEPT; iptables -A OUTPUT -o $IF -j DROP
[Peer]
PublicKey = redacted
PresharedKey = redacted
Endpoint = 86.106.84.164:1637
AllowedIPs = 0.0.0.0/0
PersistentKeepalive = 15
¶ More Info
The PostUp command is a single line executed when WireGuard starts. It:
- Dynamically detects your network gateway and interface (works on any network)
- Adds routing rules so LAN traffic bypasses the VPN
- Adds firewall rules to block all non-VPN traffic on the physical interface
This firewall is what prevents IP leaks - even if qBittorrent is misconfigured!
Detect gateway and interface:
GW=$(ip route | grep default | awk '{print $3}' | head -1);
IF=$(ip route | grep default | awk '{print $5}' | head -1);
Add LAN bypass routes:
ip route add 192.168.0.0/16 via $GW dev $IF 2>/dev/null || true;
ip route add 10.0.0.0/8 via $GW dev $IF 2>/dev/null || true;
ip route add 172.16.0.0/12 via $GW dev $IF 2>/dev/null || true;
ip route add 100.64.0.0/10 via $GW dev $IF 2>/dev/null || true;
ip route add 100.84.0.0/16 via $GW dev $IF 2>/dev/null || true;
Block non-LAN traffic on physical interface ($IF):
iptables -A OUTPUT -o $IF -m conntrack --ctstate ESTABLISHED,RELATED -j ACCEPT;
iptables -A OUTPUT -o $IF -d 192.168.0.0/16 -j ACCEPT;
iptables -A OUTPUT -o $IF -d 10.0.0.0/8 -j ACCEPT;
iptables -A OUTPUT -o $IF -d 172.16.0.0/12 -j ACCEPT;
iptables -A OUTPUT -o $IF -d 100.64.0.0/10 -j ACCEPT;
iptables -A OUTPUT -o $IF -d 100.84.0.0/16 -j ACCEPT;
iptables -A OUTPUT -o $IF -j DROP
Why the firewall blocks eth0:
- The final rule
iptables -A OUTPUT -o $IF -j DROPblocks ALL traffic on the physical interface ($IF, usually eth0) - The rules above it create exceptions for:
- Established/related connections (responses to WebUI requests)
- Traffic to LAN destinations (192.168.x.x, 10.x.x.x, etc.)
- Result: WebUI works from LAN, but torrents cannot leak through eth0
This file needs to be added to
/mnt/tank/configs/wireguard/(assuming your pool is named tank) before the container can run
There have been widespread reports of issues with this container. The main one being it will work for awhile then go down, or the port will be open then close on its own after 10 minutes or less. As such, I am not recommending this for the time being. Use at your own risk - no support will be answered for issues with this container
In Discord many people have said this container fixes the Gluetun issue. I have not tested it, but if you are using Gluetun and you get randomly discconnected every so often, try this method: qSticky.
services:
gluetun:
cap_add:
- NET_ADMIN
container_name: gluetun
devices:
- /dev/net/tun:/dev/net/tun
environment:
- TZ=America/New_York
- VPN_SERVICE_PROVIDER=custom
- VPN_TYPE=wireguard
- WIREGUARD_ENDPOINT_IP=
- WIREGUARD_ENDPOINT_PORT=
- WIREGUARD_PUBLIC_KEY=
- WIREGUARD_PRIVATE_KEY=
- WIREGUARD_PRESHARED_KEY=
- WIREGUARD_ADDRESSES=
- FIREWALL_VPN_INPUT_PORTS=6881
- SERVER_COUNTRIES= #optional
- DNS_ADDRESS= #optional
image: qmcgaw/gluetun:latest
ports:
- '8080:8080'
- 6881:6881/udp
- 6881:6881/tcp
restart: unless-stopped
qbittorrent:
container_name: qbittorrent
depends_on:
- gluetun
environment:
- PUID=568
- PGID=568
- TZ=America/New_York
- WEBUI_PORT=8080
image: linuxserver/qbittorrent:latest
network_mode: service:gluetun
restart: unless-stopped
volumes:
- /mnt/tank/configs/qbittorrent:/config
- /mnt/tank/media:/media
| Variable | Value |
|---|---|
VPN_SERVICE_PROVIDER |
This is setup as custom to accommodate any provider but there are many more providers. |
FIREWALL_VPN_INPUT_PORTS |
Comma separated list of ports |
SERVER_COUNTRIES |
Comma separated list of countries |
To add port forwarding, on the FIREWALL_VPN_INPUT_PORTS add a comma with no space and then the port which you want to forward. Make sure to make the change in the qbittorrent connection settings as well as shown below.
For more info on this container, look here
services:
nordvpn:
image: ghcr.io/bubuntux/nordlynx
container_name: nordvpn
cap_add:
- NET_ADMIN # Required for VPN
- NET_RAW
- SYS_MODULE
environment:
- PRIVATE_KEY=
- CONNECT=United_States
- TECHNOLOGY=NordLynx
- NETWORK={ENTER YOUR LAN SUBNET HERE;i.e. 192.168.1.0/24}
ports:
- 8080:8080
dns:
- 1.1.1.1
- 8.8.8.8
sysctls:
- net.ipv6.conf.all.disable_ipv6=1
- net.ipv4.ip_forward=1
volumes:
- /mnt/tank/configs/nordvpn:/config
devices:
- /dev/net/tun
restart: unless-stopped
qbittorrent:
image: lscr.io/linuxserver/qbittorrent:latest
container_name: qbittorrent
network_mode: container:nordvpn
environment:
- PUID=568
- PGID=568
- TZ=America/New_York
- WEBUI_PORT=8080
volumes:
- /mnt/tank/configs/qbittorrent:/config
- /mnt/tank/media:/media
depends_on:
- nordvpn
restart: unless-stopped
If you want to change the webui ports to something other then 8080, change the ports section to something like:
ports: - 8081:8081And change the WEBUI_PORT variable to the same port.
To get your Private Key needed to make this container work, you will need to log into your NordVPN account and head to the "NordVPN" service located on the left menu option. Scroll down until you see the "Access Token" option and click on "Get Access Token". You will likely need to verify your email address. Once verified, click on the "Generate a New Token" option and leave set to 30 day period, as the token will not be necessary after being used to generate your Private Key.
You will now use the Token you have generated to generate your Private Key by using the following command to run a container in a removal state, so that it will display in the terminal what your Private Key is for NordVPN to be able to enter into the compose file above. You will want to use a Shell that has access to the Docker service. If you have been using Dockge installed on a Truenas instance, you can shell into the Dockge app to use this command to generate your Private Key.
docker run --rm --cap-add=NET_ADMIN -e TOKEN={{{TOKEN}}} ghcr.io/bubuntux/nordvpn:get_private_key
For more info on this container, look here
services:
  qbittorrent:
    container_name: qbittorrent
    image: ghcr.io/hotio/qbittorrent:release-5.1.2
    restart: unless-stopped
    ports:
      - 8080:8080
    environment:
      - PUID=568
      - PGID=568
      - UMASK=002
      - TZ=America/New_York
      - WEBUI_PORTS=8080/tcp,8080/udp
      - VPN_ENABLED=true
      - VPN_CONF=wg0
      - VPN_PROVIDER=generic
      - VPN_LAN_NETWORK=10.99.0.0/24 #Change to match your local Network
      - VPN_LAN_LEAK_ENABLED=false
      - VPN_EXPOSE_PORTS_ON_LAN=
      - VPN_AUTO_PORT_FORWARD= # enter port number here
      - VPN_PORT_REDIRECTS= # enter port number here
      - VPN_FIREWALL_TYPE=auto
      - VPN_HEALTHCHECK_ENABLED=false
      - VPN_NAMESERVERS=wg
      - PRIVOXY_ENABLED=false
    cap_add:
      - NET_ADMIN
    sysctls:
      - net.ipv4.conf.all.src_valid_mark=1
      - net.ipv6.conf.all.disable_ipv6=1
    volumes:
      - /mnt/tank/configs/qbittorrent:/config
      - /mnt/tank/media:/media
If you want to change the webui ports to something other then
8080, change the ports section to something like:ports: - 8081:8081And change the
WEBUI_PORTSvariable to the same port (both for tcp and udp).
PIA does not provide Wireguard configuration files. Therefore it is required to use a Third party tool to generate the configration file. The tool pia-wg can be found at the github link here.
¶  Linux
Linux
-
Install the following packages from your package manager:
For Debian Based:
sudo apt install git python3-venv wireguard openresolvFor Arch Based:
sudo pacman -S git python3-venv wireguard openresolv -
Clone the git repository for pia-wg
git clone https://github.com/hsand/pia-wg.git -
Enter the new new folder
cd pia-wg -
Install the python 3 modulue venv & set venv source
python3 -m venv venv source venv/bin/activate -
Install pip requerments
pip install -r requirements.txt -
Run pia-wg
python3 generate-config.py -
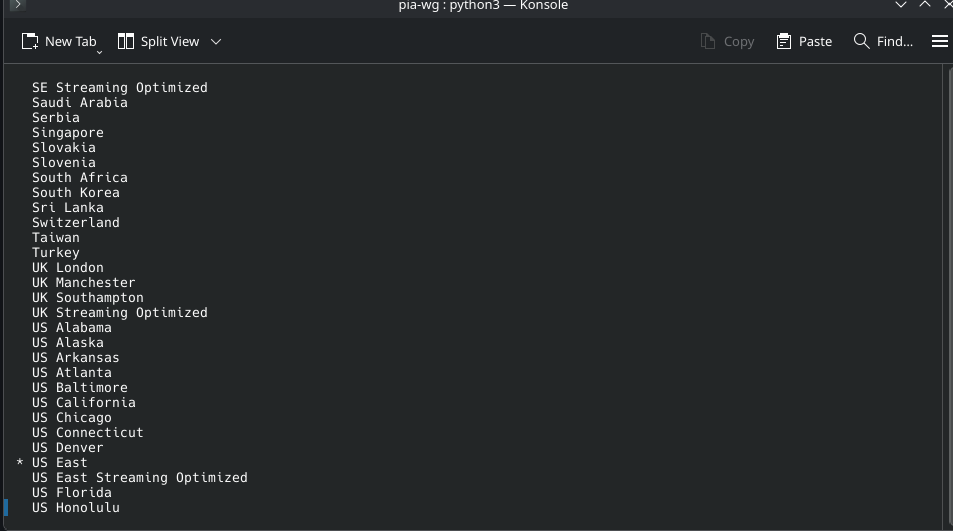
Use your up and down arrows to select a Region & press enter
-
Enter username & Password. Press Enter
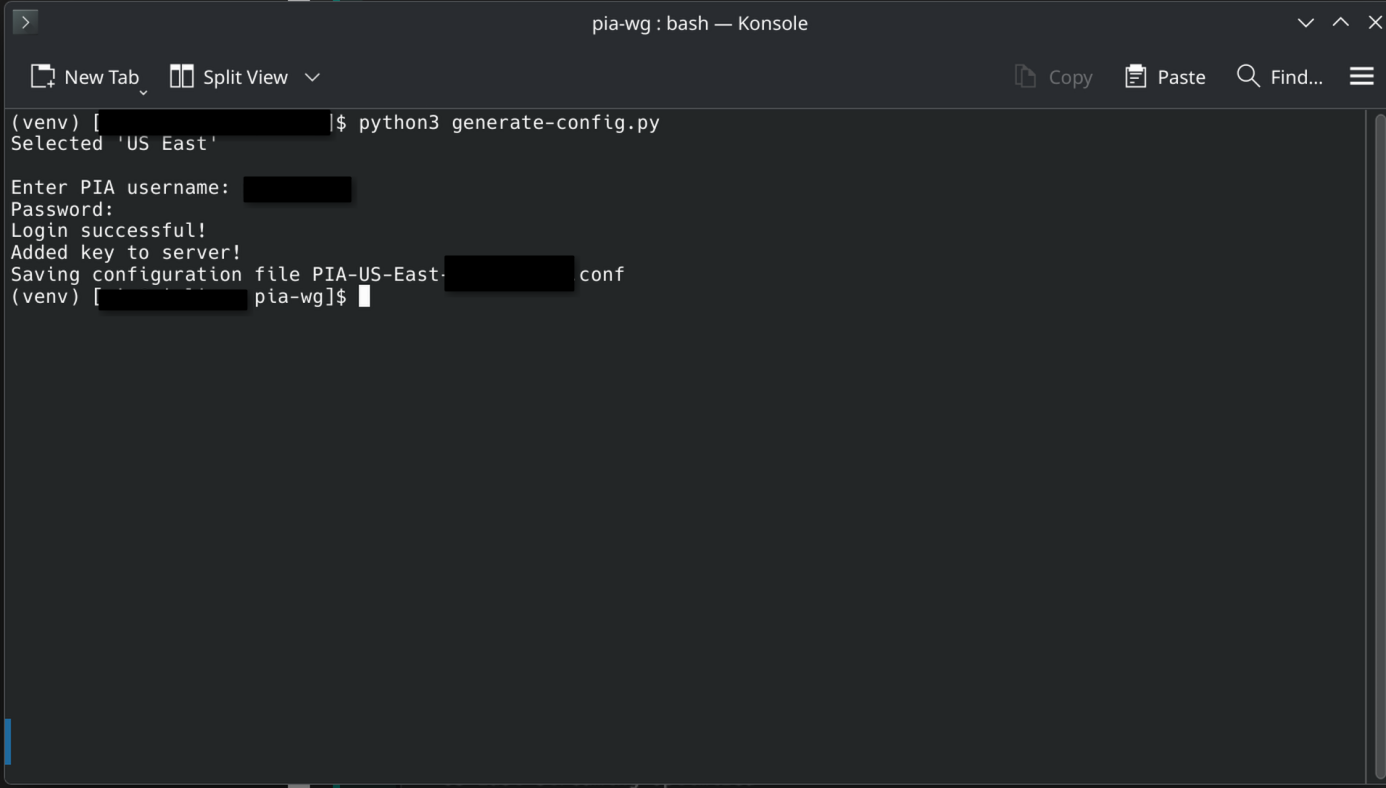
-
Open the genrated file and copy it's contants
-
Create your wg0.conf file in TrueNAS
sudo su nano /mnt/tank/configs/qbittorrent/wireguard/wg0.conf -
Paste your configration into nano with CTRL+SHIFT+V
-
Save and close nano
¶ 2 · Testing Open Ports
To test if your port forward is working correctly, shell into qBit and execute:
curl ip.me
to get the IP address you are using. Then plug that IP + your port into this tool.
¶ 3 · Leak Test
If you are worried about your public IP being visible conduct a leak test by uploading a test .torrent to your qBit and reading the IP results from Bash.ws
¶ 4 · Testing Functionality
To test everything is working, try downloading this Ubuntu torrent. Once you have it downloaded, upload it into qBit by using the ➕ button in the upper left corner.
A result of downloading at any speed indicates a success. If it stalls or errors something is wrong with permissions or dataset structure.
¶  5 · YouTube Walkthrough
https://www.youtube.com/watch?v=WVM3Wgb290g
¶ 6 · qBittorrent Configuration
¶ 6.1 Logging In
To login to the webUI, navigate to http://{serverIP}:8080. If when you first try to open the app and you receive a blank page which just says “Unauthorized”, don't worry, you did everything correctly. Click the URL bar and hit Enter and you should be forwarded to the login screen. The default username is admin and the password is set randomly. To see it, go into the logs and look for this line:

If you are having an issue where qBit is running but you cannot reach the webUI and you are coming into your network over VPN, be sure to add the VPNs IPv4 range to the
VPN_LAN_NETWORKline in a comma separated list, no spaces
¶ 6.2 Configuration Options
Click on the cog icon  in the bar or select Tools > Options in the tool bar. I will tell you what to change tab by tab. If it is not mentioned, it is left as the default value
The Default Save Path needs to be modified to be /media/downloads if you followed the Folder Structure guide.

In the Listenting Port section, add the port given to you by AirVPN (see the AirVPN page for instructions).
Uncheck all the boxes under Connection Limits.

If you are using private trackers only, uncheck all the boxes in the Privacy grouping. If you are using public trackers, leave this section default.
Uncheck the box for Torrent Queuing.

¶ VueTorrent
To get VueTorrent (I put mine in /mnt/tank/media/downloads/VueTorrent) run this command in the TrueNAS shell:
git clone --single-branch --branch latest-release https://github.com/VueTorrent/VueTorrent.git /mnt/tank/media/downloads/
In the Web UI tab, check the box for Use Alternative WebUI and enter the path of the VueTorrent folder (/media/downloads/VueTorrent).
I keep mine up to date (assuming I save it in /mnt/tank/media/downloads) by adding this command to TrueNAS in System → Advanced Settings → Cron Jobs running as root:
git -C /mnt/tank/media/downloads/VueTorrent pull
¶ Qui
To use Qui instead, visit the Qui page to deploy the container alongside qBittorrent.
Change the Network Interface to VPN (yours might also say wg0 or tun0).

If you're experiencing high memory usage when using Qbittorrent, change these settings and restart the container