¶  What is Nextcloud?
Nextcloud is a self-hosted cloud file storage and collaboration software that offers productivity, control and compliance for any organization.
¶ 1 · Deploy Nextcloud
 Docker Compose
 TrueNAS
services:
 nextcloud:
   image: lscr.io/linuxserver/nextcloud:latest
   container_name: nextcloud
   environment:
     - PUID=568
     - PGID=568
     - TZ=America/New_York
   volumes:
     - /mnt/tank/configs/nextcloud/config:/config
     - /mnt/tank/configs/nextcloud/data:/data
   ports:
     - 8887:443
   restart: unless-stopped
I have changed the PUID and PGID to the TrueNAS apps user and group. I have also changed the external port in to one which is less likely to have anything running on it.
-
Under the Nextcloud Configuration add the ffmpeg, smbclinet, and ocrmypdf packages
-
Add a Tesseract Language Codes set to eng (if you speak english)
-
When doing the deployment, make sure to use secure passwords for the Admin User, Admin Password, Redis Password, and Database Password
-
The Host should be the FQDN you plan to use (like nextcloud.example.com)
-
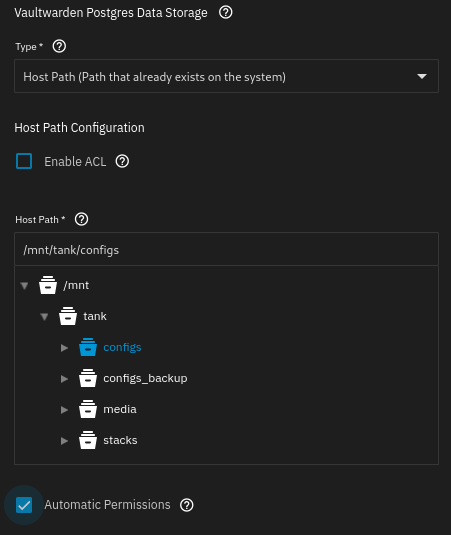
For the Storage Configuration make either datasets or subdirectories for the AppData Storage, User Data Storage and Postgres Data Storage. They all must be in separate directories.
When setting the hostpath for the Postgres dataset make sure to check the box for Automatic Permissions or the app won't launch!
If you want to access directories on your NAS, be sure to add Additional Storage so Nextcloud can see it
Check out the new docs from TrueNAS
¶ 2 · Post-Install
Nextcloud will have some warnings from certain variables not being set out-of-the-box. Shell into Nextcloud, run this command, then restart your container:
occ config:system:set maintenance_window_start --value=3 && \
occ maintenance:repair --include-expensive && \
echo 'Header always set Strict-Transport-Security "max-age=15552000; includeSubDomains; preload"' >> /etc/apache2/conf-available/security.conf && \
a2enconf security && \
service apache2 restart && \
occ db:add-missing-indices && \
occ config:system:set default_phone_region --value="XX" && \
occ config:system:set mail_smtpmode --type=string --value="log"
¶ 3 · Nextcloud Configuration
¶ 3.1 Accessing Your Container
You will not be able to go to the private IP of your Nextcloud instance because you need an https connection for it to work. This may work if you set a Certificate ID in TrueNAS during install, but it won't matter because we need to adjust the Trusted Domain array no matter what.
To do this, go the the directory where the configs are stored (usually the mount path followed by /var/www/html/config/config.php). Edit this file and find the Trusted Domains Array and add another line at the bottom for your FQDN. Make sure it lines up underneath the other entries as spacing matters. Your line should look like 4 => 'nextcloud.example.com', incrementing to whatever number would be next in your array. Once this is done restart the container.
¶ 3.2 Adding External Storage
The point of Nextcloud is to be able to access your files remotely. To do this, you need to add Additional Storage from TrueNAS or another volume in the compose file so Nextcloud can see your files. Once you have that added, navigate within Nextcloud to Apps (top right circle) → Disabled Apps → External Storage and Enable that app.
Once that is enabled navigate to Administration Settings → External Storage (the one at the bottom under the Administration heading). Give it a name in the leftmost box, then in the Configuration field enter the path you mounted it as (so if I added a volume which was /mnt/tank/files:/files I would use the internal path here of /files). Add a person or group that this will be available to and click the check box at the end of the row. I recommend you also click the 3 dot box at the end of the row and select the checkbox to Enable Sharing so you can give people links to your files if you want.
¶ 3.3 Logging in With Your Phone
To access the fastest way via mobile, use a QR code to login. To generate the QR code:
- Navigate to Administration Setings → Security
- At the bottom, add an App name then click the blue button next to it to Create a new app password
- Click the button to Show QR code for mobile apps
¶ 4 · Office Suite Overview
To use Nextcloud as a collaborative document platform you add a separate office back-end and point Nextcloud at it. As of Nextcloud Hub 26 Spring, the integration is chosen under Apps → Office → "Select your preferred office suite," which now offers two options:
| Collabora Office | Nextcloud Office (Euro-Office) | |
|---|---|---|
| Based on | LibreOffice (LOOL) | OnlyOffice fork |
| Best at | ODF, legacy files, security | Microsoft formats, browser performance |
| Trade-off | Heavier in the browser | Limited ODF compatibility (improving) |
The picker only selects the integration — it notes that "installing requires manual server setup." You still deploy the back-end container and configure its address + secret. Sections 4 (Collabora) and 5 (Euro-Office) cover both.
¶ 4.1 · Deploy Collabora
First deploy the Collabora container.
¶ 4.1.1 Docker Compose
services:
  collabora:
    image: collabora/code
    container_name: collabora
    restart: unless-stopped
    ports:
      - 9980:9980
    environment:
      - TZ=America/New_York
      - domain=office\\.example\\.com
      - server_name=office.example.com
      - username=admin
      - password=adminpassword
    volumes:
      - /mnt/tank/configs/collabora:/data
Note for the domain it needs to be in regex. Replace what I have with your correct FQDN values.
¶ 4.1.2 Reverse Proxy
We now need a reverse proxy entry for something like office.example.com pointed to an https entry for our sever IP. If you use Cloudflare tunnels it will look like this:
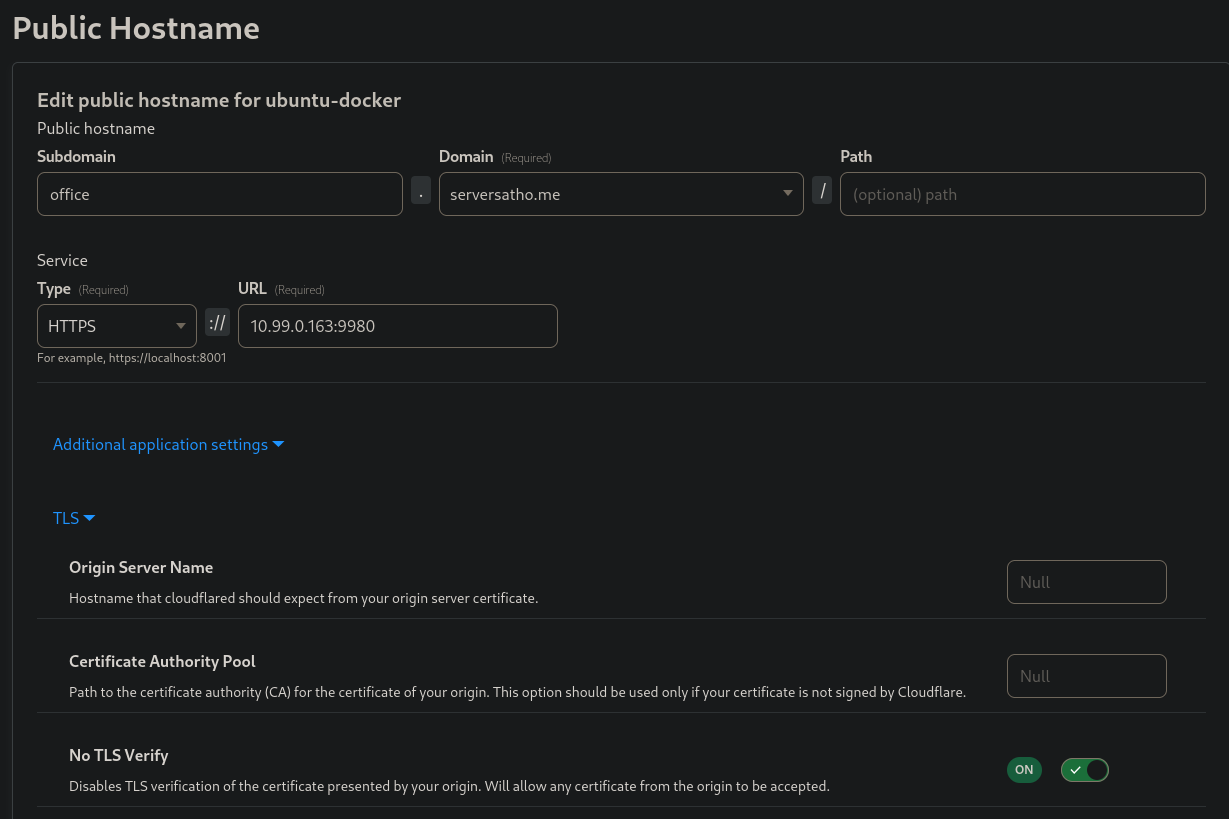
Note that since Collabora has its own self-signed certificate we need to check the No TLS Verify option with Cloudflare or the tunnel will not connect.
¶ 4.1.3 Nextcloud Settings
Navigate to Settings → Office & text, select the Collabora Office card, and install it if prompted. Then open Administration Settings → Office, click the radio button to Use your own server, enter the address of your FQDN and click save. You should see a green bar across the top that says Collabora Online server is reachable.
¶ 4.2 · Deploy Euro-Office (Alternative to Collabora)
Euro-Office is the new Nextcloud Office back-end shipped with Hub 26 Spring. It is a self-hosted OnlyOffice fork with strong Microsoft-format compatibility and fast in-browser editing.
¶ 4.2.1 Docker Compose
services:
  euro-office:
    image: ghcr.io/euro-office/documentserver:latest
    container_name: euro-office
    restart: unless-stopped
    ports:
      - "8080:80"
    environment:
      - JWT_ENABLED=true
      - JWT_SECRET=
    volumes:
      - /mnt/tank/configs/euro-office/data:/var/www/onlyoffice/Data
      - /mnt/tank/configs/euro-office/logs:/var/log/onlyoffice
      - /mnt/tank/configs/euro-office/lib:/var/lib/onlyoffice
Generate the secret with openssl rand -hex 32 (the connector requires at least 32 characters).
¶ 4.2.2 Reverse Proxy
Add a public hostname (e.g. office.example.com) and — unlike Collabora — point it at an http origin: http://euro-office:80 (same Docker network) or http://<truenas-ip>:8080.
The connection must work in both directions: the browser and Nextcloud must reach the Document Server, and the Document Server must reach Nextcloud back (the save-back callback). If the callback can't reach Nextcloud, documents open but never save.
¶ 4.2.3 Nextcloud Settings
- Go to Apps → Office and select the Nextcloud Office (Powered by Euro-Office) card. Install the connector if prompted.
- Open Administration Settings → Office and set the Document Server address to your proxy FQDN (e.g.
https://office.example.com/). Use the public FQDN, not a LAN IP — the connector blocks local addresses by default. - Enter the Secret key (JWT) matching your compose
JWT_SECRETand save. You should see a green "server is reachable" confirmation.
¶  5 · Video
https://youtu.be/ibL9qAlUZes
https://www.youtube.com/watch?v=pAebJIDT_oc
https://youtu.be/qn5ccoCabdA